lab00 : Deployment Practice
| num | ready? | description | assigned | due |
|---|---|---|---|---|
| lab00 | false | Deployment Practice | Mon 04/13 04:00PM | Wed 04/22 11:59PM |
In this individual lab, you will practice deploying a web app to the cloud using the stack that your group has chosen.
Purpose: To ensure that each member of the team is familiar with how to deploy the chosen technology stack
Each member of your project team should complete the appropriate version of this lab as an individual
You’ll start with a few steps that are common to both versions of the lab.
You’ll the continue the lab with steps specific to your technology stack.
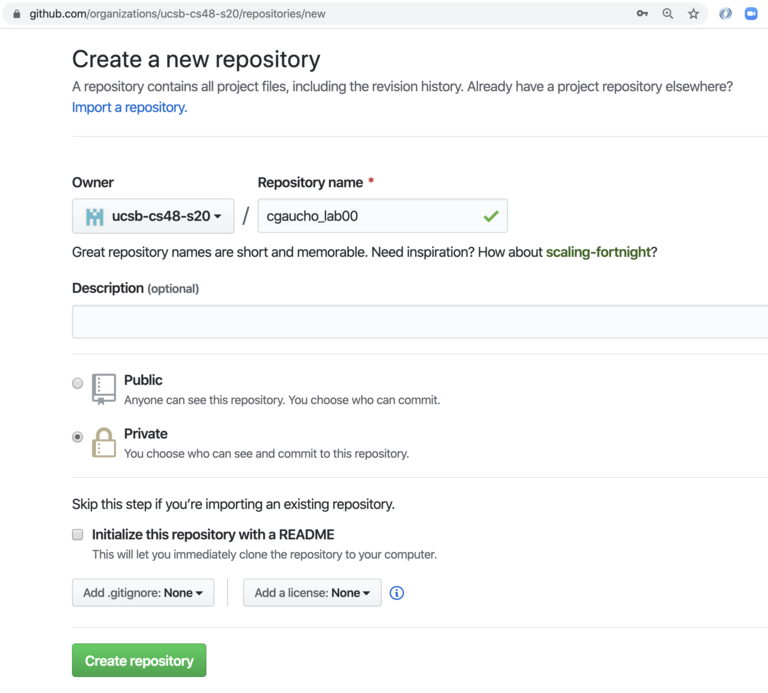
Step 1: Create a repo
Create a new github repo in the ucsb-cs48-s20 organization (not under your own github id).
The name of the repo should be your githubid, followed by _lab00
- For example, if your github id is
cgaucho, the name should be cgaucho_lab00
The repo should be:
- private
- initially empty (no README, no .gitignore, no LICENSE)
The reason we are creating an empty repo is that we’ll be pulling in starter code from another repo in a later step.
Here is what that should look like:
Step 2: Decide where you will work
Your next step is to decide whether you are going to work:
- on your own laptop/desktop system
- by ssh’ing into CSIL
Here are some of the pros and cons:
| Location | Pros | Cons |
|---|---|---|
| Your own machine | Less likely to run out of disk space | Must install software |
| CSIL | No need to install software | May run out of disk space, especially for Next.js |
Notes for running locally
- Installing software on your own machine is typically straightforward. We can try to assist during course staff office hours. Please know. however, that we cannot necessarily provide detailed tech support for every possible operating system version. You will ultimately be resposible for dealing with any OS specific issues.
Note for running on CSIL
- On CSIL, disk space has typically not been an issue for Spring Boot. However, next.js does typically take up quite a bit of disk space for dependencies and it is easy to blow past your disk quota. This article describes some techniques for dealing with disk quota issue on CSIL: CSIL: Disk Quota and File Quota issues
- When running on CSIL, a web server running on
localhostwill not be accessible in your local browser unless you take special steps to make it accessible, such as setting up ssh port forwarding. That process is described here: CSIL: SSH Port Forwarding
Step 3: Install Git
Skip this step if you are working on CSIL; git comes pre-installed.
If you decide to work locally, you’ll need at least git on your local machine.
- For MacOS, open a terminal prompt and type
git --versionat the prompt. Ifgitis not installed, you’ll be prompted to install the Command Line Tools part of XCode. Proceed with the install, and afterwards you should havegit - For Windows, we recommend this installation: https://git-scm.com/download/win
- This also provides the “git bash shell”, which is a handy tool to have at your disposal.
- For Linux, it is likely that
gitcomes pre-installed, but if not, consult the documentation for your distribution.- For distributions that use
apt, it is likelysudo apt update; sudo apt install git - For distributions that use
yum, it is likely:sudo yum install git
- For distributions that use
When you can type git --version at the command prompt on your system, and it shows a version rather than an error such as command not found, you are ready to proceed.
Step 4: Configure git
You may skip this step if you’ve already configured git on the machine where you are working.
Step 4a: Configure name and email
When you use git to add commits to a project, it attaches your name and email to the commit as part of the metadata.
To configure this, type the following commands, substituting in your name in place of Your Name and your email in place of you@example.com.
git config --global user.name "Your Name"
git config --global user.email you@example.com
Step 4b: Configure ssh keys
Configuring ssh keys for GitHub allows us to allows us to avoid having to type in our git password many times per session. So while not strictly required, it is highly recommended. All further instructions in the course will assume you have done this step; if you don’t, you’ll need to adjust the instructions to use https based urls instead of the SSH based ones that start with git@github.com:.
To configure your SSH keys for GitHub, follow these instructions.
Notes:
- You should generate the keys on the system where you plan to work: generate the keys on CSIL if you plan to work on CSIL, and on your laptop if you plan to work on your laptop.
- If the
ssh-keygencommand is not available on your system, do a web search to try to determine how to install it for your platform.)
Step 5: Clone your repo
Now, cd in the directory where you plan to do your work for this course (e.g. perhaps ~/cs48), type this command to clone your empty repo into that directory. In place of repo-url-goes-here, copy the URL for the new repo you created. That will be, for example: git@github.com:ucsb-cs48-s20/cgaucho_lab00.git but with cgaucho replaced with your GitHub id.
git clone repo-url-goes-here
That should create a new empty directory (well, almost empty) called lab00-cgaucho. Use cd lab00-gaucho to put yourself i that directory.
If you then type ls -a you’ll see that the directory is not completely empty. It contains a .git subdirectory, which is how you know that this is a git repo rather than an ordinary directory.
You are ready now to switch to the file that contains the specific instrucitons for different versions of the lab, depending on your technology stack.
Next Steps
For the remainder of the lab, there are two different versions of the instructions, depending on the technology stack chosen.
| Stack | Detailed Instructions | Deployment Platform |
|---|---|---|
| Spring Boot (Java) | lab00_sb | Heroku |
| next.js (JavaScript) | lab00_nj | now.sh |