lab00_nj : Deployment Practice: Next.js
| num | ready? | description | assigned | due |
|---|---|---|---|---|
| lab00_nj | false | Deployment Practice: Next.js | Mon 04/13 04:00PM | Wed 04/22 11:59PM |
This page describes detailed steps for completing lab00 using Next.js.
Please complete Steps 1-5 on the lab00 page first.
Step 6: Add remote for starter code
If you followed Step 1-5 lab00, you should now be at a terminal prompt, and your
current directory should be the repo you created for lab00, with a name such as cgaucho_lab00.
The next step is to add a git remote for your starter code.
- If you already know how this works, you can just type the command and skip the explanation below
- If you have not worked with remotes before, please read this explanation carefully.
git remote add starter https://github.com/ucsb-cs48-s20/demo-nextjs-app.git
Explanation of the git remote command
If you know the command git push origin master, in this command:
originis a remotemasteris a branch
A remote refers to the location of a repository other than the current local repository (the one on your local filesystem.) By convention, when you git clone a repository, it creates a remote called origin that points back to where you cloned the repo from.
We are going to add another remote for the starter code. You’ll only pull from this remote once; you won’t have permission to push to it.
Step 7: Pull remote into local repo
Now, we are going to pull from the starter code remote into the local repo, and then push to the origin repo
git pull starter master
git push origin master
At this point, you should be able to visit the github organization (https://github.com/ucsb-cs48-s20) and see your repo listed as one of the private repos to which you have access (you won’t see it unless you are logged in to your github account.) You should also see that it has all of the files from the starter repo.
Step 8: See example of completed app
The example app here shows what the app looks like when it is fully deployed on the web.
Try logging into this app with any Google account you have (e.g. your UCSB Email Account).
You should be able to login, logout, and show a picture of a random dog.
- Note that the menu item “Random Dog With Auth” appears only when you are logged in.
- If you log out and try to access the same URL to which that menu item takes you, i.e. https://cs48-btk5h-demo-nextjs-app.now.sh/woof-private, the app will force you back to the login screen before it allows you to see the random dog.
Once you’ve complete the steps in this lab, you should be able to:
- Run this app locally
- Deploy this app to the web at the address https://cs48-cgaucho-lab00.now.sh (where
cgauchois replaced with your githubid).
Now that we know what we are trying to accomplish, let’s proceed.
Step 9: Install node
If you are working on CSIL, you may skip this step, because as of this writing (April 12, 2020), a sufficient version of node is installed on CSIL:
[pconrad@csil-05 ~]$ node --version
v10.16.3
[pconrad@csil-05 ~]$
You may also skip this step if, when you type the command node --version on your local system. you see a version that is 10.* or higher.
Otherwise, follow the instructions here for installing node:
Additional installation advice for specific platforms can be found here:
- MacOS: https://ucsb-cs48.github.io/jstopics/node_macos/
- Windows: https://ucsb-cs48.github.io/jstopics/node_windows/
- Linux: https://ucsb-cs48.github.io/jstopics/node_linux/
When you have finished with those instructions, you should be able to do each of these at the terminal prompt:
- type
node --versionand get a number that is10.*or higher (e.g.v10.16.3) - type
npm --versionand get a version number (as opposed tocommand not found) - type
npx --versionand get a version number (as opposed tocommand not found)
Step 10: Type npm install
As explained in the README.md for the starter code:
The first time you clone this repo, as well as any time you pull/switch branches, you should update the project’s dependencies by running
npm install
So, first make sure that you have done a cd into your githubid_lab00 repo, and then type:
npm install
You should see a lot of output, and with luck no error messages.
- Special note for MacOS users: if you see
gyp: No Xcode or CLT version detected!and other errors aboutgyp, then check the page https://ucsb-cs48.github.io/jstopics/node_macos/ for instructions on fixing this.- The short version is that you may need to reinstall the XCode command line tools. This takes 3-5 minutes on a decent home internet connection.
- After reinstalling the XCode Command Line tools, repeat the
npm installcommand and the errors related togypshould go away.
You may ignore these warnings that appear when you do npm install:
npm WARN bootstrap@4.4.1 requires a peer of jquery@1.9.1 - 3 but none is installed. You must install peer dependencies yourself.
npm WARN bootstrap@4.4.1 requires a peer of popper.js@^1.16.0 but none is installed. You must install peer dependencies yourself.
Despite the note that you must install these peer dependencies, in fact, you do not need to install jquery and popper. The reason is that we’re installing bootstrap is only for its stylesheets, not for the javascript-based component implementations that it has. We already have react-bootstrap as a dependency, which reimplements those javascript-based components in react, completely removing the need for the bootstrap implementations.
There’s some discussion about marking those dependencies optional on the github page, but it’s on hold until the next major release of bootstrap https://github.com/twbs/bootstrap/pull/30328
Step 11: Explanation of “running on localhost”
Running on localhost is also known as development mode
If you know what is meant by “running on `localhost’” you can skip the following explanation, and go straight to the next step.
Running on localhost means that
- we are running the server on our local machine
- it can only be accessed from web browsers running on that local machine
Running on localhost is convenient for testing code as we develop; it is not the way we make the web app available to real users.
For next.js apps, running on localhost typically means we interact with the running web app by pointing our browser to http://localhost:3000, however:
- The local machine in this case might be our own laptop or desktop machine, or it might be CSIL.
- If it’s your laptop or desktop, It depends on where you are working. If the local machine is CSIL, you’ll need to use SSH forwarding to be able to see your running app. Consult https://ucsb-cs48.github.io/topics/csil_ssh_port_forwarding/ for details.
Step 12: Configuration of OAuth for Localhost
The example repo uses Google OAuth for logins/logouts. Before we can run the application on localhost, we need to do some configuration.
The instructions for doing this configuration are linked to in the README.md file of the starter repo, which you can read here: https://github.com/ucsb-cs48-s20/demo-nextjs-app/blob/master/README.md
When you have followed these steps and put the correct values into your .env file, you can proceed to the step where you run the application.
Step 13: Test application on localhost
The instructions for running are in the README.md file of the starter repo, which you can read here: https://github.com/ucsb-cs48-s20/demo-nextjs-app/blob/master/README.md
The basic command is npm run dev
Start up your server and verify that you can interact with it on localhost:3000 in the same ways you interacted with the sample implementation at https://cs48-btk5h-demo-nextjs-app.now.sh/
If it works, proceed to the next step.
Step 14: Configure secrets for GitHub Actions
At this point, if you look at your GitHub repo, you’ll probably see that there is an red X next to the commit hash on the main page, as shown in the image below.
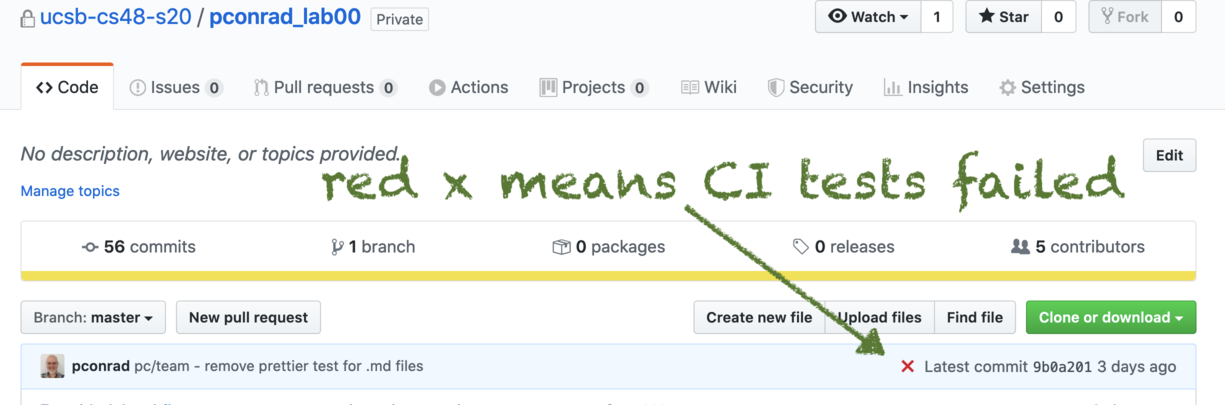
The red x signifies that GitHub Action is trying to run test cases for this repo, but the test cases are failing. This is likely because the secrets necessary for GitHub Actions to succeed have not yet been configured.
The next step in the README.md describes how to configure secrets for GitHub actions, and links to https://github.com/ucsb-cs48-s20/demo-nextjs-app/blob/master/docs/auth0-github-actions.md where this is decribed. Please follow these instructions.
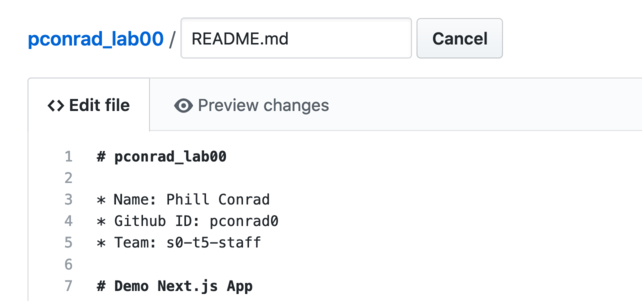
Then make a commit to the README.md of your own repo, in which you add your name, github id, and team to the top of the README. You can do this directly in the GitHub web interface. Here’s what that would look like:
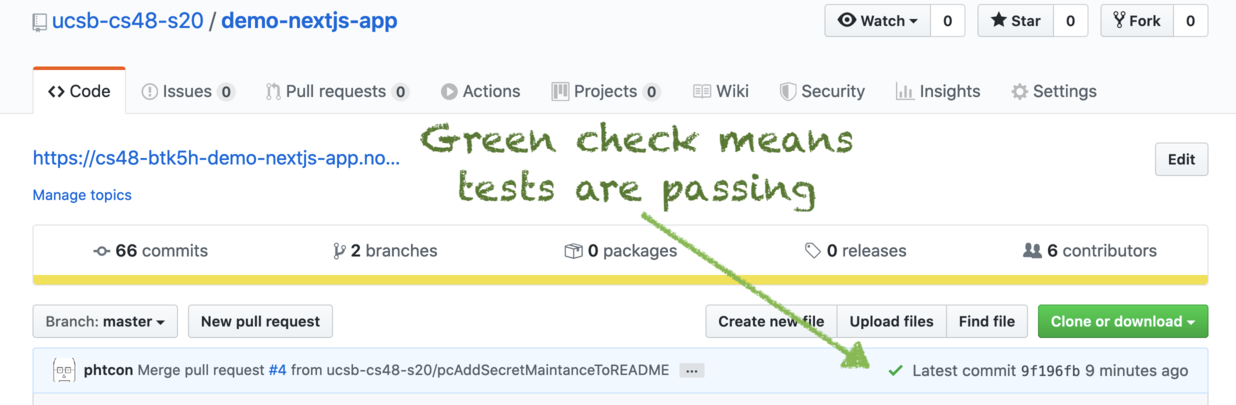
That commit should trigger GitHub actions to run, which should result in first a yellow circle, then a green check next to your commit hash.
Yellow dot (signfying tests are still running):

Green check signfifying tests are passing:
After doing this commit, if you get the green check, do this to pull these change to the README.md into your local repo:
git pull origin master
Step 15: Pull updates from starter code New!
Just as we were releasing lab00, now.sh released:
- some new features to allow per-project secrets
- new versions of some of the dependencies
This allowed the course staff to greatly simplify the deploy process.
But it does mean that we need you to update your repo from the starter code.
Assuming you still have the starter defined as a remote, just do:
git pull starter master
If you are working in a different clone from the one where you defined the starter remote, just define it again the same
way as you did before, prior to running this command.
After doing this, repeat the npm install command to update the dependencies before proceeding.
Step 16: Configure application to run on now.sh Heroku
In this step, we put the application online on the public web, using a service known as now.sh. Heroku.
We will also refer to this as “running in production”, since it is a public facing version of our running code, running 24/7 on a web server in the cloud.
The instructions for doing this are in the README.md for the starter code under the heading:
Deploying to now.sh for the first time
Deployment to Production
Follow those instructions, including the adjustments needed to the Auth0 configuration for production.
Step 17: Submit on Gauchospace
When you have a running web app, visit https://gauchospace.ucsb.edu/courses/mod/assign/view.php?id=3766298&forceview=1 and make a submission.
In the text area, enter something like this, substituting your repo name and your Heroku app name:
on now.sh: https://cs48-cgaucho0-lab00.now.sh
on Heroku: https://cs48-cgaucho0-lab00.herokuapp.com
Then, and this is super important, please make both of those URLs clickable urls.
The instructions for doing so are here: https://ucsb-cs48.github.io/topics/gauchospace_clickable_urls/
Grading Rubric:
TBA. It will be 100 points divided across the steps in the lab.