OAuth: Google Setup
Setting up a Google OAuth App to obtain client id and client secret
Setting up OAuth for Spring Boot
How to set up Google OAuth for localhost
- Navigate to https://developers.google.com/identity/sign-in/web/sign-in to create a Google OAuth Application.
-
If you are asked “Where are you calling from”, select “Web Server”
-
Set the Authorized Redirect URI to:
http://localhost:8080/login/oauth2/code/google
-
- Add the following items to your
secrets-localhost.propertiesfile, filling out theclient-idandclient-secretwith the values from your Google OAuth applicationspring.security.oauth2.client.registration.google.client-id: PUT-CLIENT-ID-HERE spring.security.oauth2.client.registration.google.client-secret: PUT-CLIENT-SECRET-HERE - Run
mvn spring-boot:run
How to set up Google OAuth for Heroku
- Navigate to https://developers.google.com/identity/sign-in/web/sign-in to create a Google OAuth Application.
- If you are asked “Where are you calling from”, select “Web Server”
- Set the Authorized Redirect URI to:
https://your-app-name.herokuapp.com/login/oauth2/code/google
- Add the following items to your
secrets-heroku.propertiesfile, filling out theclient-idandclient-secretwith the values from your Google OAuth applicationspring.security.oauth2.client.registration.google.client-id: PUT-CLIENT-ID-HERE spring.security.oauth2.client.registration.google.client-secret: PUT-CLIENT-SECRET-HERE -
Run the script
setHerokuEnv.sh --app your-app-nameIf you don’t have a
setHerokuEnv.shscript for your app, create one that looks like this:#!/usr/bin/env bash heroku config:set PRODUCTION_PROPERTIES="$(cat secrets-heroku.properties)" "$@" -
Deploy the app on Heroku
These instructions apply when you are setting up Google OAuth directly, which is what we typically do for Spring Boot applications.
If, instead, you are setting up Google OAuth using Auth0, follow these instructions instead:
Setting up Google OAuth for a web app
Before you start, you need the name of your app, e.g. cs48-cgaucho-lab00.
You’ll get back two values: a client-id and a *client-secret. You’ll store those somewhere in the configuration for your app (exactly where depends on the tech stack you are using).
Setting up a Google OAuth app from the “button”
If you visit the page https://developers.google.com/identity/sign-in/web/sign-in there is a button that looks like this:
In the context of the page, it’s here:
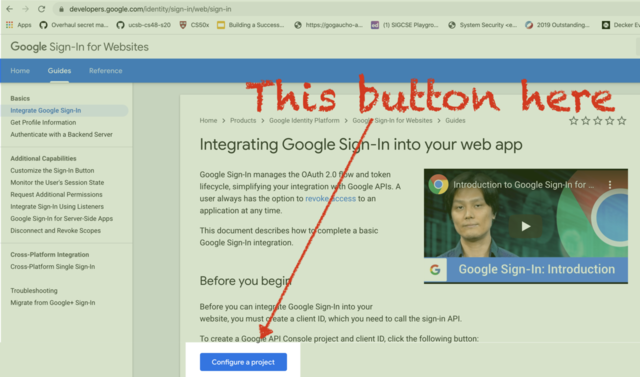
Click this button. You’ll be walked through the following sequence of steps:
-
Createa new project
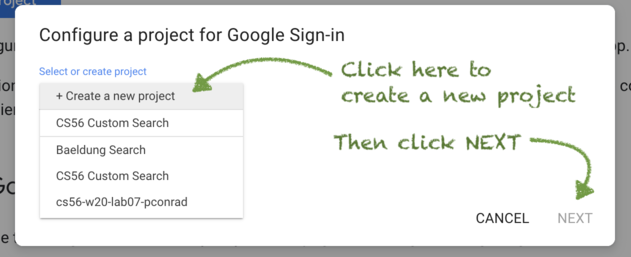
In this step, you are creating a new project. Later, you’ll be able to list all of the projects you’ve created and manage them at the https://console.developers.google.com/.
-
Enter the project name:
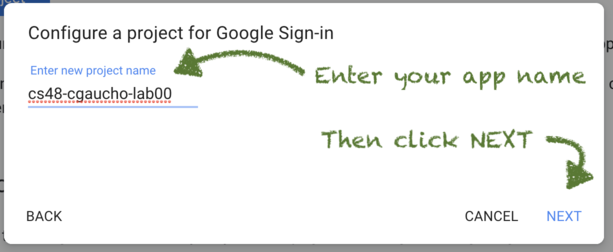
The project name is the name that shows up in the Google Developer Control Panel to identify your app.
- This might be, for example,
cs48-cgaucho-lab00orcs48-s20-ride-share - It’s often the same as the name of your app on your hosting service (e.g. Heroku or now.sh)
- This might be, for example,
-
Enter the product name:
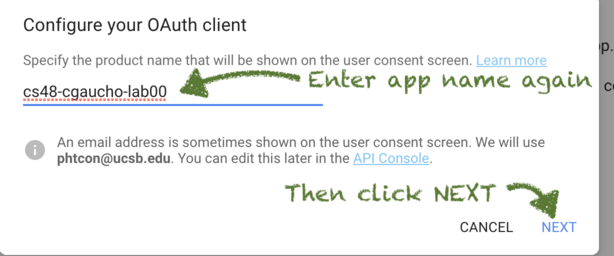
The product name is usually the same as the project name. The difference is that this is the name shown to the end user when they are logging in to your app.
It usually makes sense to just enter the same name as the project name, unless you have a really good reason to do otherwise.
-
Select
Web Serverand enter the Redirect URIs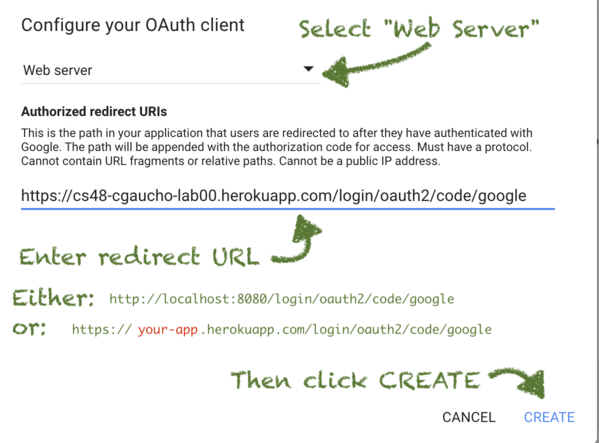
Here, you are being asked for one or more authorized redirect uris.
The redirect URI is used by Google OAuth to redirect the user back to your application after verifying the users credentials. It’s important to get this precisely correct; a redirect URI mismatch is one of the most common errors that comes up in configuring the OAuth flow.
The precise URI will depend on the tech stack you are using:
- For a Spring Boot app on localhost, it will be http://localhost:8080/login/oauth2/code/google
- Note that this is
http(nothttps)
- Note that this is
- For a Spring Boot app called
cs48-cgaucho-lab00running on Heroku, it will be https://cs48-cgaucho-lab00.herokuapp.com/login/oauth2/code/google- Note that this should be
https(nothttp)
- Note that this should be
- You may be able to list both the
localhostand the heroku uri, separated by commas.
- For a Spring Boot app on localhost, it will be http://localhost:8080/login/oauth2/code/google
-
Obtain the client-id and client-secret
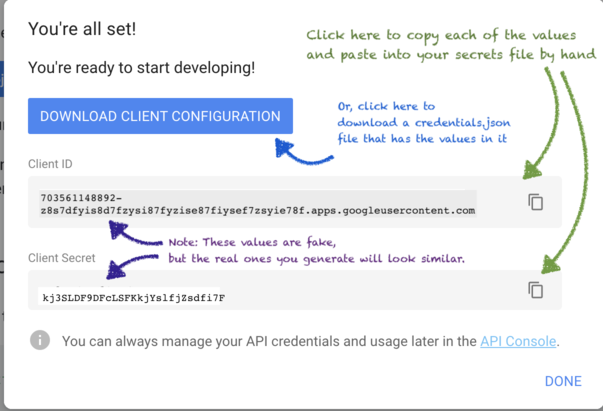
At this step, you are provided the client-id and client-secret
You can use the buttons to copy these to the clipboard and then paste them where they belong.
- The details of where they belong depends on your specific tech stack.
- For Spring Boot apps, these typically go into
secrets-localhost.propertiesfile, like this:spring.security.oauth2.client.registration.google.client-id: PUT-CLIENT-ID-HERE spring.security.oauth2.client.registration.google.client-secret: PUT-CLIENT-SECRET-HEREsecrets-heroku.propertiesfile, in the same way.
-
Some repos also have a script called
convertGoogleCredentials.py; in this case, you can download the secrets to a file calledconfiguration.json, and run the script to produce the secrets in a format suitable for copying and pasting into the applicable.propertiesfile. -
An additional step is necessary for Spring Boot on Heroku; to copy the values from your
secrets-heroku.propertiesfile to Heroku, you need to run the scriptsetHerokuEnv.sh, with a parameter--app your-app-namewhereyour-app-nameis the app name on Heroku.For example:
./setHerokuEnv.sh --app cs48-s20-cgaucho-lab00If you don’t have a
setHerokuEnv.shscript for your app, create one that looks like this:#!/usr/bin/env bash heroku config:set PRODUCTION_PROPERTIES="$(cat secrets-heroku.properties)" "$@"
Using the script convertGoogleCredentials.py
When setting up Google OAuth, you can download the credentials into a
file called credentials.json.
The Python script convertGoogleCredentials.py available in the demo
repo: https://github.com/ucsb-cs48-s20/demo-spring-google-oauth-app
can be used to convert the credentials.json file to the format used
in Spring Boot properties files.
console.developers.google.com
You can manage existing Google OAuth projects from the url https://console.developers.google.com/
Related topics:
- OAuth: Authorizing GitHub Third Party Apps—Gradescope, and GitHub OAuth Apps you build yourself
- OAuth: GitHub Setup—Setting up a GitHub OAuth App to obtain client id and client secret
- OAuth: Google Setup—Setting up a Google OAuth App to obtain client id and client secret