lab01 : Starting your project: Story Map
| num | ready? | description | assigned | due |
|---|---|---|---|---|
| lab01 | true | Starting your project: Story Map | Thu 01/17 04:00PM | Wed 01/24 07:00PM |
| Points |
|---|
There is nothing to “hand in”, or “submit” in the traditional sense. All of the work is done online in your project repo, on the Github web interface.
Your work will be checked by the instructional staff directly on Github.
You may also end up doing some work on a whiteboard and/or flip chart. You should take photos of that,
and upload them to your repo, under the ./team directory, inside a directory called ./team/lab01/ as instructed below.
Note that throughout these instructions ./team refers to the directory
team at the root of your project repository; the same directory where
you put your ./team/NORMS.md file in a previous lab.
You are encouraged to do this on a branch or fork, and do a pull request, as with all changes to your project’s repo.
Note to mentors and TAs:
Please also consult lab01_mentors page for instructions on what mentors and TAs should do to prepare for this lab, support students as it unfolds, and provide feedback and grades afterwards.)
Step 0: Preparation (ideally, completed before lab)
In lecture, we watched the three videos below. If you missed lecture, please watch these videos before coming to lab.
- Part 1 (12:12) (Planning): https://youtu.be/IsuIZaqnIuU
- Part 2 (10:15) (Using a Github Project Kanban Board): https://youtu.be/8U0FezxxMGU
- Part 3 (16:28) (More User Stories and Issues): https://youtu.be/lIB0WJzgSs8
If you want to reference the slides from the videos, they are here:
- From User Story Mapping to Kanban in Github, a presentation by Phill Conrad and John Cutler
Creating Your Story Map
Step 1: Gather in your team
Here is the new for seating chart teams in lab. Gather in your row first.
| Row | Story Map Location 4pm | 5pm | 6pm |
|---|---|---|---|
| 1 | blue-spotify-queue | buy-my-clothes | park-finder |
| 2 | gold-scheduler | countries-over-time | stock-trading-6pm |
| 3 | gold-spotify-queue | help-those-in-need | ucsb-rooms |
| 4 | sleep-schedule | ucsb-rideshare | when-2-meet-6pm |
| 5 | stock-trading-4pm | 5pm-when-2-meet |
Once everyone has gathered, the TAs will instruct you where to go to work on your story map.
- During the 4pm section, we have access to the lab, plus Phelps 2510
- During the 5pm and 6pm sections, we have access to the lab, plus Phelps 3526
We will set up white board or flip board chartsfor each of you, along with markers at various locations. You can use paper or a white board, as you see fit.
Be sure, though, to use only whiteboard safe markers on the whiteboards!
Step 2: Start documenting your team’s work
On your flipchart, or on the whiteboard:
Write the name of your project, your mentor, and the names of the people on your team, (with a checkmark beside those that are present, and an X by those that are absent.)
Example:
Project: Gaucho GE Grabber
Mentor: Julia Roberts
Team: Phill Conrad ✓, Jinjin Shao ✓, Santha Ramamoorthy ✓, Henry Yang ✗, Oprah Winfrey ✗
Taking attendance for today’s lab, and making sure your name is on the flip chart with a ✓ or an ✗ is a portion of your group’s grade for today’s work.
NOTE: Having a group member (or two) absent will not cause your group’s grade to be reduced for this lab. However you are require to record attendance in order for the group to get full credit for the lab.
Graded: (20 pts) You earn these points if/only if:
- your group produced a chart in the requested format during lab on Thu, Jan 17.
- you took accurate attendance, accounting for all members of your group (See the teams page for a list of group members)
- you took a picture of this and uploaded it to the /team directory of your
repo, under a subdirectory called
./team/lab01/, with the name./team/lab01/chart01.pngor./team/lab01/chart01.jpg. Please use the requested name to make your chart easier to find.
Step 3: Discuss the User Journey
(This step is not graded, per se, but you can’t meaningfully accomplish the later stages if you try to skip it.)
As a team, discuss the “user journey” for your proposed application.
That is, try to describe all of the events that lead someone to seek out your webapp and have an interaction with it, or perhaps a series of interactions.
There should be a beginning, a middle and an end, where value is exchanged:
- the user came with a goal, need, or desire, and
- that goal was met, that need was satisfied, or that desire was fulfilled.
Identify:
- What is that goal, need or desire?
- What is the series of events, in chronological order?
Discuss this with your group, and on your paper, write down whatever comes to mind.
IF IT IS HELPFUL, you could use the form shown in the video, and illustrated in class, where you have a series of stories that form column headings across the top of the page, and then you have descriptions of specific user interactions as sticky notes in the columns, as illustrated here (click for larger image):
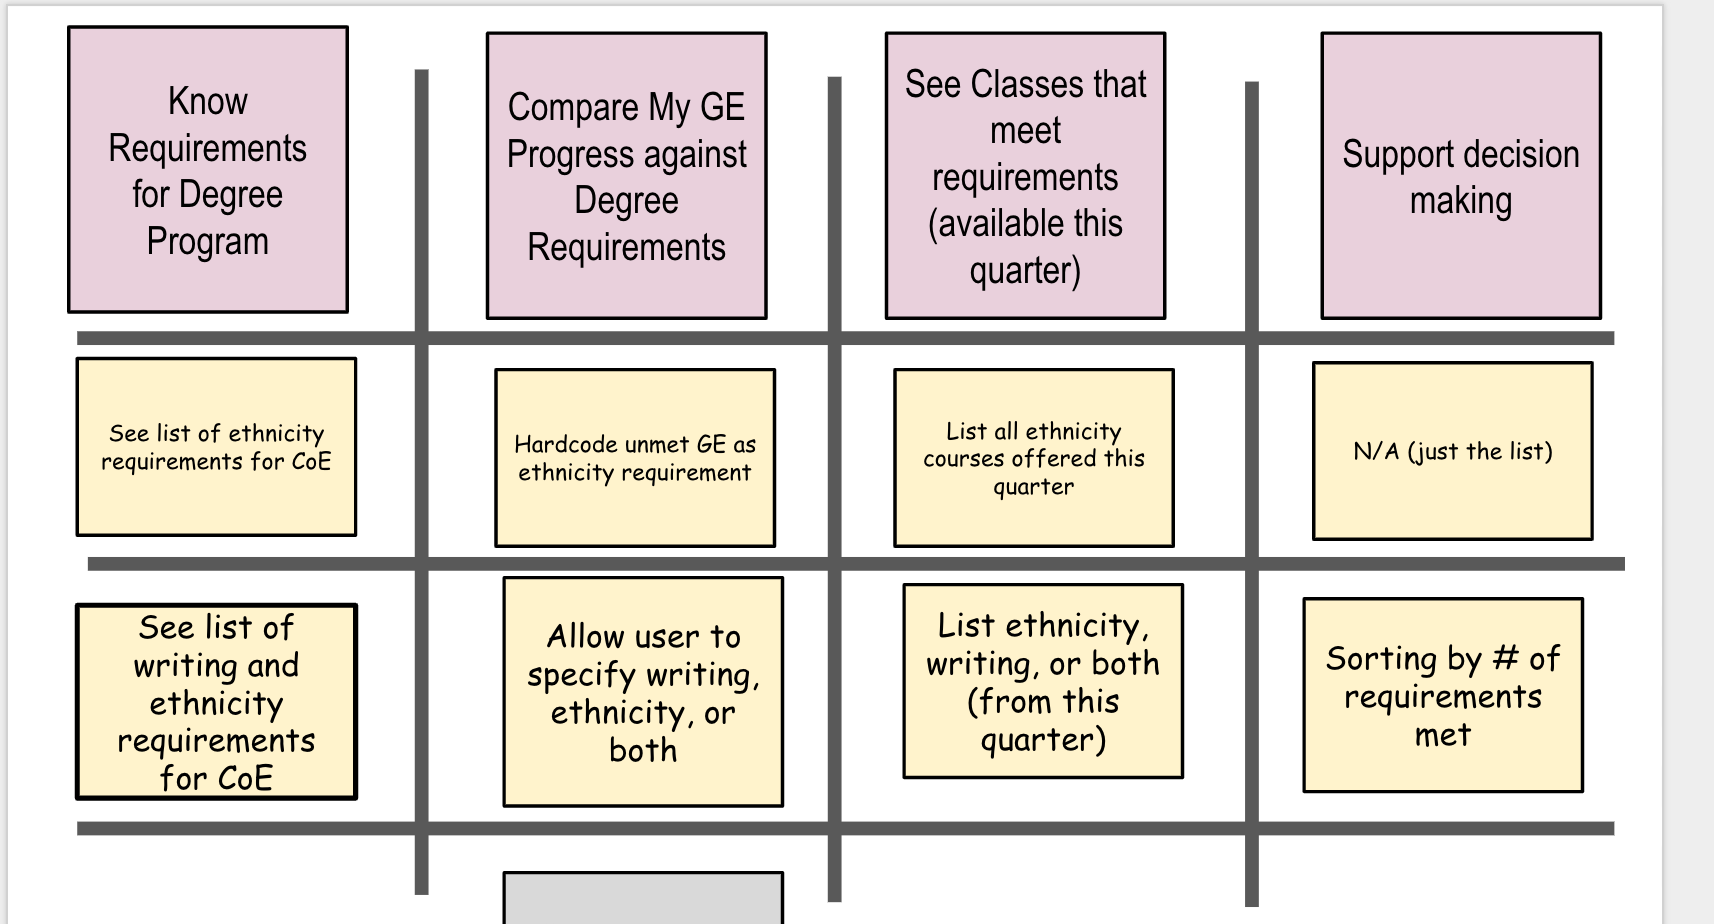 (Click the image above for a more legible version)
BUT: at this stage, it is more important to get the ideas flowing. There is no specific “right or wrong” way to get your ideas down on the paper. Just write something that captures the group consensus, or the candidate proposals, for the “user journey”.
It can take any form: a list, or pictures, a collection of As a __ I can __ so that __ type stories, or any combination of those. Don’t get bogged down on what form it takes. Just get something down.
NOTE: Try to keep your description VERY HIGH LEVEL, avoiding specific implementation details.
- Good: User selects a beverage from among several choices
- Too much detail: User clicks on a drop down menu; each beverage has an image which flashes with an animation as you hover over it, etc. etc.
You don’t have to do this “perfectly” the first time. You may need to first get it all out as “brain dump” that contains too much detail, and then move to a higher level. But get to the higher level as soon as you can.
Don’t move on to the next step until you have the “spine” of your customer journey captured in some fashion.
You’ll know you have it, and you are ready for this step when:
- It tells a coherent story. You can describe this to any reasonable person (e.g. a UCSB student that isn’t in this class, particularly one that might be a target user) and they will be able to follow what you are saying.
-
None of your “spine” should be “implementation” focused. It shouldn’t depend, for example, even on whether it happens to be a webapp, or a mobile app, or even an app at all. It shoudn’t depend on technology specifics.
- The value exchange part is clearly identified: the goal/need/desire of the user, and how that gets acheived/met/fulfilled
Step 4: Move towards minimum viable product
(This step is not graded, per se, but you can’t meaningfully accomplish the later stages if you try to skip it.)
Now you have an outline, in some form (whatever form seemed reasonable to you)
At this stage, the story you have might have gone in one of two directions:
- Grand Vision (GV): You might have a story that really is very much your “ideal dream state” of the application when fully built out. Keep in mind that this may be far more than you can reasonably accomplish in the next 4 weeks.
- Minimum Viable Product (MVP) You might have already been thinking in terms of “minimal viable product”, and you might have a really nice thin slice of value for your end user, something you might actually be able to deliver in 4 weeks (or 1 week, or even 1 day.)
It’s likely that each of our teams will be somewhere on the spectrum between these two extremes. Discuss where you think your team is on that spectrum.
Assuming that your team is somewhere closer to GV than to MVP, you’ll now want to set aside the description of your GV for the moment. Use it as a reference to inform your efforts to redo the exercise, but focusing on an MVP.
Maybe you can draw on top of your GV description, and circle the parts (in a different color) that you think might be part of your MVP.
The big question to keep in mind is:
How can we make “this” possible for the user with less complexity, less code, less time
Here “this” is the goal/need/desire.
Step 5: (Optional) Make a new chart in the form shown in part 1 of the video
(This step is not graded, and you might be able to skip it. Read through the information below and decide if completing this step would be helpful. Once you’ve read through it, you can always decide to skip it for now, and come back if you find that you are stuck.)
At this stage, you need to make a decision.
- Are you ready to go straight to user stories and tasks, as shown in part 2 of the video?
- Or, would it help to first make a new user story map, in the format shown in part one of the video (and illustrated in the picture?)
If making a new map would help, do that. If you are ready to go staight to user stories and issues in Github, then go to the next step.
OPTIONAL but STRONGLY ENCOURAGED: If you made additional charts
on the whiteboard or a paper flip chart, take pictures of them,
and upload them to your repo under the ./team/lab01/ directory.
You already have a (required) ./team/lab01/chart01.jpg or ./team/lab01/chart01.png, for example, so you are encouraged to continue that naming
conventions with chart02.jpg, chart03.jpg, etc.
Step 6: (Required, Graded) Make a Kanban board for your project
Now, we are at the part that is most important to the future success of your project, and the part for which you will be graded
Your mentor will have set up a github repo for your project under the organization [ucsb-cs48-w19](https://github.com/ucsb-cs48-w19].
You will now make a Kanban board as illustrated in the video (Part 2)
Go to the github web page for your repo, and go to Projects, and create a project.
- Name it the same as your project plus w19
- Create a Basic Kanban board (Todo, In Progress, Done)
- Delete the three “starter cards” as shown in the video using “Delete Note”
Now, take your story map, and turn it into:
- User stories, in the form
As a _ I can _ so that _, which become “Note” cards. - Issues (tasks) which you put under each of those User Stories
You should end up with at least 3 issues that your team could start working on.
At least one of them should be a “hello world” app in the framework that your team has chosen. For THIS particular issue ONLY, please create as many copies of the issue as there will be indivdiuals or pairs working on it (i.e. three to six copies, depending on your group size, and whether you work individuals or pairs.)
You’ll do this work in a branch or fork of the main repo, and then make a pull request.
HOWEVER, you’ll decide as a team which of these is the best implementation of the Hello World, code, and should serve as the basis for all future development of your app. That is, you’ll be starting with this Hello World code, and building your app on top of it.
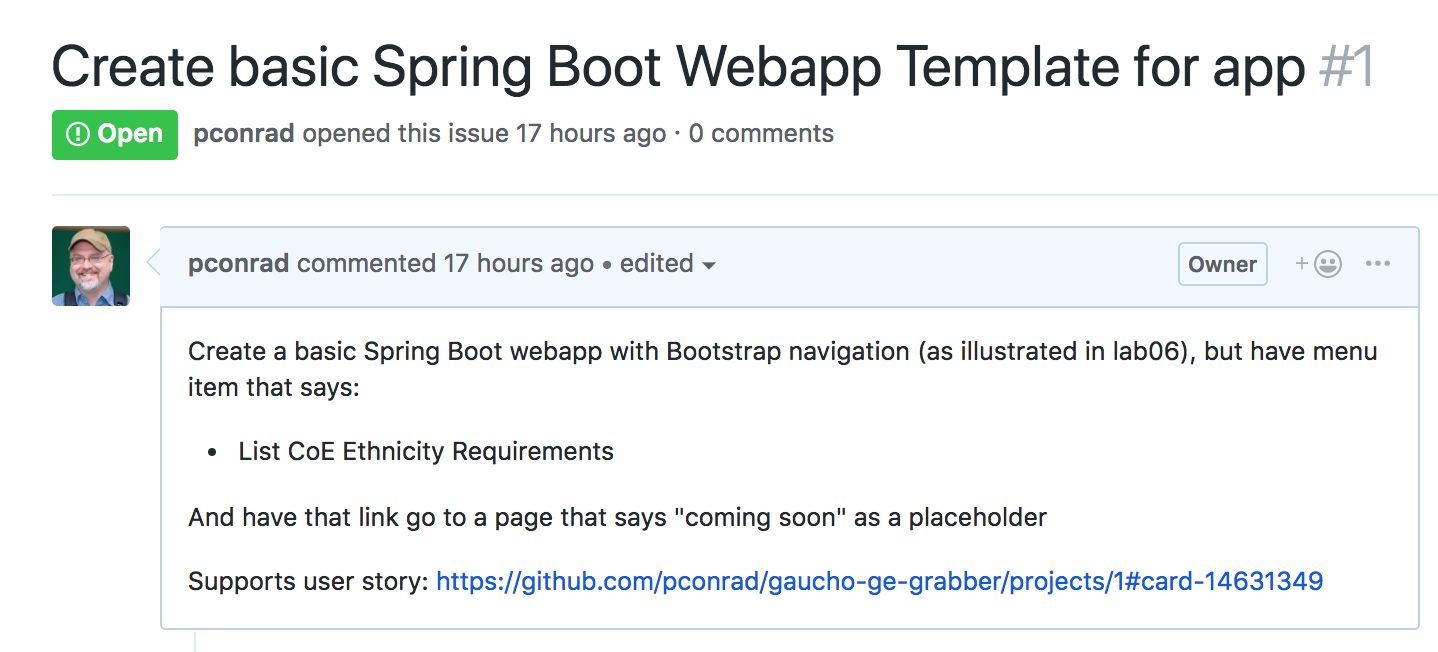
(Click the image above for a more legible version)
Graded: (20 pts) You earn these points if/when you:
- met the criteria for the previous item (present in lab, team forked repo, you are a collaborator), AND
- your team has created a Kanban board by the due date of the lab, (Wed, Jan 24 at 7:00PM)
Step 7: Have your mentor review your Kanban board
Ask your mentor to look over your Kanban board and make comments on your user stories and issues.
If the issue is clear to them, and has their blessing, they should make a comment that includes the words:
“Mentor Approved”
If your mentor has questions/concerns, they’ll make those in the comments. You may want to iterate with them until all of the user stories and issues are “Mentor Approved”. However, this is not a requirement; just something you are encourged to work towards.
Graded: (30 pts) You earn these points when and if
- your team has a set of issues for your team to work on by the due date for this lab, i.e. (Wed, Jan 24 at 7:00PM).
Step 8: Make initial assignment of issues
Each member of your team should be assigned to at least one issue. You can assign multiple developers to a single issue; this is how you form pairs, trios, and mobs of 4 or more.
Members that are not present should take responsibility for ensuring that they
- are either added to existing issues (after communication with the team members already on that issue), or
- for creating additional issues, again, after appropriate communication with the other team members
Graded: (30 pts) Your team earn these points as when each team member is assigned to at least one issue by the due date of this lab, i.e. (Wed, Jan 24 at 7:00PM).
Points are pro-rated based on team size, i.e.
- 6 person team: 5 pts/member
- 5 person team, 6 pts/member
(These points do not require being physically present in lab on (Thu, Jan 17 .)
What Comes Next?
You start working on your assigned issues!
Credits: Many thanks to John Cutler for his assistance in consulting on this assignment.